 Two weeks ago, the state of Alabama overturned a 30 year ban on yoga instruction in public schools. Now yoga can be taught in schools there, with a few caveats.
The bill continues the transformation of modern yoga into a secular, physical, health-centric exercise practice, a process that began about 100 years ago in India. As far as the bill promotes health in students, it is to be applauded. But its understanding of the essence of modern yoga is off the mark, which leads to a couple mistaken restrictions, like the exclusive use of the English language. According to the bill, "All instruction in yoga shall be limited exclusively to poses, exercises, and stretching techniques. All poses shall be limited exclusively to sitting, standing, reclining, twisting, and balancing. All poses, exercises, and stretching techniques shall have exclusively English descriptive names. Chanting, mantras, mudras, use of mandalas, induction of hypnotic states, guided imagery, and namaste greetings shall be expressly prohibited." These stipulations come from concerns over the possibility of yoga's inherent religiosity or spirituality. Religious teaching of any kind is not permitted in public schools, and some worry that even non-religious yoga practices are a trojan horse, smuggling Hinduism or Buddhism into the curriculum. At the root of the confusion is a common term: yoga. It can refer to old practices or new, spiritual, religious or physical. The confusion arises when we do not know which are being taught, or when we think they are all the same. The Alabama bill makes this mistake, equating yoga practice with Hinduism. It requires parental permission for any student to participate, including the statement, "I understand that yoga is part of the Hinduism religion.” Let’s look at this misunderstanding in a little more detail. Practices called yoga have been around for thousands of years. For most of history, yoga was spiritual, a practice of linking one's awareness with the eternal soul within, or with a deity. In this way, yoga can be associated with Hinduism. But yoga that is practiced today is different. In the early 20th century, yoga practice became largely physical and focused on health, downplaying or entirely dropping its spiritual and religious elements. According to yoga scholar Mark Singleton, conceptions of yoga in the 20th century are shaped by "modern physical culture, 'healthism', and Western esotericism." In other words, modern yoga is closer to gymnastics than prayer. Even though they share the same name — yoga — modern practice is fundamentally different from earlier spiritual forms. Confusion is common. Most people who do not practice yoga, and even many who do, mistakenly think that the postures and exercises in a yoga class are ancient and inherently spiritual in nature. But most of the stretches and asanas in a yoga class come from calisthenics, gymnastics and dance as recently as the last few decades. As such, they are exercises that look good, feel good and improve our health. Singleton writes, "among outsiders and practitioners alike, there is often little awareness that these modes of [modern] practice have no precedent (prior to the early twentieth century, that is) in Indian yoga traditions.” So it is no surprise that parents and politicians fear inherent Hinduism in yoga, even though little or none exists in its modern iterations. THE SANSKRIT LANGUAGE This same misunderstanding appears in the Alabama bill with regard to language. Though it is not stated explicitly, the insistence on "exclusively English descriptive names" seems to be a way to prevent the use of the Sanskrit language, most likely due to fear that Sanskrit will smuggle in Hinduism or Buddhism. But non-English languages are fundamental parts of many disciplines. In music, every student learns the Italian allegro, andante, forte and piano, words meaning fast, slow, loud and soft. And biologists often use Latin to classify species like homo sapiens. Some yoga postures are named after Hindu deities. For example, Hanumanasana is named after the god Hanuman; Virabhadrasana is named after Virabhadra; Vasishthasana is named for Vasishtha. These names and their deities are rightfully forbidden from public schools, just as any mention of Moses, Jesus or Mohammed would be. But other postures are named for secular objects like shapes and animals. There is Trikonasana, the Triangle Posture; Vrikshasana, the Tree Posture; Bhujangasana, the Cobra Posture, among countless others. Surely these names do not infringe upon religious freedom or inherently imply Hindu worship, whether in English or Sanskrit. And there is no harm in learning the Sanskrit word for tree. At its core, then, the new bill in Alabama continues the secularization, exercise and health focus of modern yoga. In this way, it isn't terribly different from the twentieth-century innovations of Vivekananda or Yogendra, who removed unattractive traditional beliefs in favor of modern ones. — Singleton, Mark. 2010. Yoga Body: The Origins of Modern Posture Practice. Oxford University Press.
1 Comment
 The issue of cultural appropriation has been troubling yoga lately. Did the West steal yoga from India? Does India own yoga? Do Indians naturally and inherently understand yoga because of their cultural heritage? Is it in their blood? Some have suggested that non-Indians should not teach yoga.
Three elements are worth stating briefly before we answer the central question. First, any claim that intelligence, knowledge, understanding or ability can be judged by a person’s heritage or race should be recognized for what it is. At best it is nationalism, at worst it is racism. With yoga, the sentiment is understandable on several levels. Yoga has become a billion dollar industry beyond India's borders. Furthermore, much about what modern yoga is today shifted drastically while India was under British rule. The desire to reclaim a popular system as one’s own is relatable. Yoga, like many other trades, practices or professions can be passed down generation to generation. At a young age, the next in line takes over the family business. They grow up around it and learn everything there is to know about it from the older generation. This is different. This is closer to a master/apprentice or guru/disciple relationship. In this case, the second generation will have knowledge and understanding that the outside world won't have. But this is because of the immense time spent learning and studying the craft. If the child of an expert chooses not to study or practice yoga for example, they cannot expect to know a great deal about it even if they are directly related to an expert. Second, heritage of a subject or art form in a country does not give that country exclusive ownership of it. Ideas and goods have been traded internationally for thousands of years, evolving as they go. The Chinese cannot claim the exclusive right to make paper, the Babylonians mathematics, nor the Indians yoga. Third, we need to be clear about what we mean by 'yoga'. This may seem obvious, but it is nuanced enough to deserve a little explanation. There is no doubt that yoga originates in India. The ancient Katha Upanishad is its first known explanation. For thousands of years, yoga was a spiritual practice of uniting one’s awareness with an eternal spirit within, or with a deity. In the twelfth century, a practice with bodily elements developed, called hathayoga, the 'yoga of force'. But the goal was the same, to create spiritual unity with a higher being. In the early twentieth century, this changed drastically. Over the course of a couple decades, yoga was refashioned as a modern, scientific, physical practice for health. Modern yoga represents a fundamental break from the older spiritual iterations. It shows influence from European physical cultures like gymnastics and calisthenics. As such, even India’s claim as the singular authentic source of modern physical yoga is worthy of healthy debate. But let’s get back to the central question: who should be teaching yoga? The answer is the same as for any topic, whether mathematics, physics, astronomy, music or literature. A topic should be taught by those who have knowledge of it. Regardless of their age, gender or race, a teacher needs no more — and no less — than expertise of their subject. This gets more complicated because of the unequal power structures permeating the world. Those that know should teach. However, those that have resources should work to make sure that those who have less still have the opportunity to learn if they choose to. Perhaps the question is not who should teach, but rather how do we make high quality education affordable and available. This issue has quickly moved in the wrong direction as more and more "teacher" trainings see big money to be made. This is in exchange for the promise of the title of teacher, often with not enough regard for the task of actually training a teacher. As for the suggestion that non-Indians should not teach yoga, the nationalistic element should quickly be discarded. Furthermore, we need to address the quality of yoga teachers. The only worthwhile question to ask about a potential yoga teacher is this: do they know what they are doing? 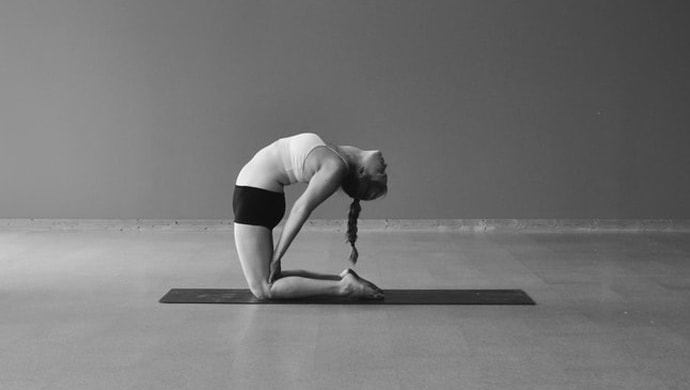 Yoga, like pretty much every other skill, relies on a combination of factors. Two of the most important are knowledge and practice. Knowledge is our understanding of more theoretical concepts: why we are doing it, what is the underlying belief system, how might I improve, etc. Practice is the actual putting-in-motion of these concepts: the hours, days, months and years of using the body and mind to build experience and generate progress.
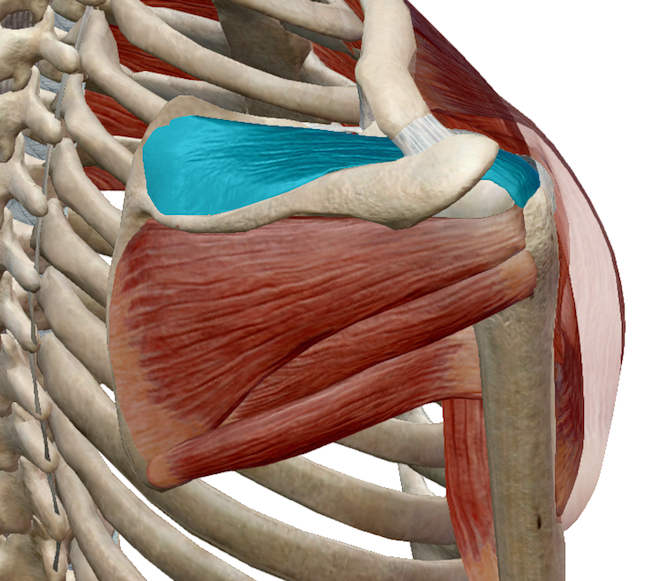
These two are powerful when used together. They are much less impactful when apart. KNOWLEDGE Knowing what you believe, why you believe it, what you're practicing and why is absolutely essential to any sort of progress. If you don't know these things, any effort you exert could easily be put in the wrong direction, taking you further from your goals rather than closer to them. If you want to go north but don't have a compass, it doesn't matter how fast you run. You are likely to unknowingly head in the wrong direction, getting further from your goal. And the harder you work, the further you get. Yoga practice is the same way. Whether you're trying to improve your balance, stand on your hands, breathe better, or have deep meditation, it is essential to first know what to do. Each of these goals will require different techniques, and if you use the wrong one you will essentially make progress in the wrong direction. Therefore knowledge is indispensable to progress. Effort or practice without knowledge can be futile and counterproductive. This can lead to frustration. Often, when you feel stuck in your practice, it is greater knowledge rather than greater effort that will help. Knowledge helps us refine our understanding of who we are, where we are, where we want to go, and how to get there. PRACTICE The other half of the conversation is the effort we exert toward our goals — practice. It may be obvious to say, but this is where the actual progress happens. If you want to go north and you know which direction is north, you still have to put one foot in front of the other and actually go north. No amount of knowing will get you there. It is easy for intellectual people to overemphasize knowledge. We think that if we know more, then we will make more progress. We continually collect and consume copious amounts of information and knowledge. But we make limited progress this way. Knowledge must be accompanied by practice, because our bodies and minds grow through use. To improve our balance, we must allow the body to learn how to connect the feet, legs, hips, etc. No amount of study will do this. Only actual practice. Also, study uses the mind in a specific way, essentially practicing one skill. If we study a lot, we will get good at studying. But we won't improve other skills, like balancing, breathing or meditating. To progress at those, we must practice them. PUTTING THEM TOGETHER There is a well-known saying in the yoga world, often attributed to K. Pattabhi Jois, the founder of Ashtanga Vinyasa Yoga: "Yoga is 99% practice, 1% theory." The quotation is probably hyperbolic, intended to make a point. But the danger in this mentality is that it may encourage thoughtless practice and effort. To return to our analogy, it is like saying "99% walking, 1% checking the compass." As teachers, we speculate that the lesson Jois was trying to teach is: Don't get stuck in thinking about things. And don't think that knowledge will save you or be enough on its own. You must practice. We agree with this, but we also think that the opposite is equally likely. Students may think that practice and effort are enough on their own. Then they will cultivate very little knowledge or understanding of what they're doing and why. They will end up making progress in the wrong direction. We think that the two are equally important: 50% practice, 50% knowledge. The two feed and inform each other. Your actual practice will help you understand why ancient scriptures say what they do. And your knowledge of history, philosophy, and your own goals will help your practice be more effective and productive. 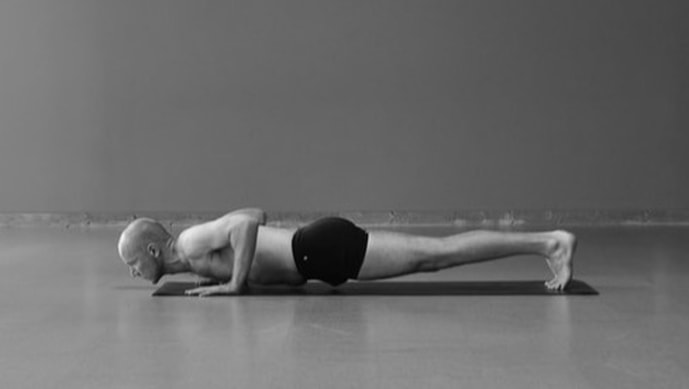 This is part of a series about Injuries In Yoga. Last month we wrote about the common shoulder injury Shoulder Impingement. The other common injury to the shoulder happens in the front, where the short head of the biceps muscle attaches to the shoulder blade, a biceps tendon strain. This injury is most common in Ashtanga Vinyasa and subsequent 'flowing' yoga styles that incorporate a lot of Sun Salutations and chaturangas. The shoulder can't do this action very well, and the biceps become strained before too long. 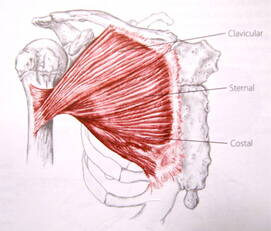 Pectoralis major ("pec") Pectoralis major ("pec") To understand this injury, we have to talk about shoulder mechanics and the muscles that move the arm. PECTORALIS MAJOR & ADDUCTION One of the biggest and most powerful muscles of the shoulder is the pectoralis major, commonly known as the 'pecs' or just the 'chest muscle', pictured to the left. It connects the arm (humerus) directly to the middle of the chest. Its main function is to pull the arm toward the chest in an action called adduction. Try it: hold your arm out to the side (as pictured below, labeled adduction), then bring your arm toward the center, so you end up with your arm pointing forward. As you do this, you will feel your 'pec' engage. When you apply this motion to something like a pushup, the arms need to be away from the body, so the pushup motion will be pulling the arm inward toward the chest. Simply put, this means keeping your elbows away from the body. This is the safest way to do any pushup motion. 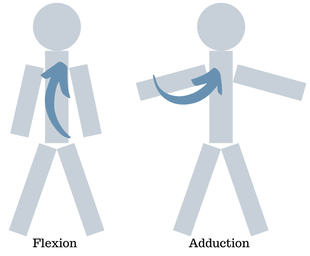  BICEPS & FLEXION
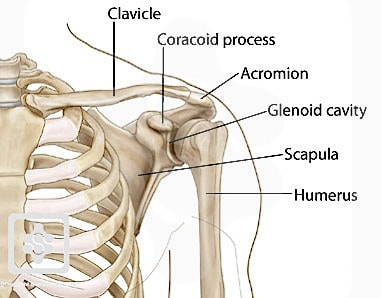
In contrast, if we start with our arms down by the sides and lift them up until they point forward, this is called flexion (pictured above, labeled flexion). When we lift the arm like this, the pec doesn't get activated much, so the work is done by much smaller muscles like the anterior deltoid (the front of the shoulder cap) and the biceps. The biceps cross two joints; they bend the elbow and also flex the shoulder. But they don't have the power to move the body's entire weight. When we do pushups or chaturangas with the elbows close to the sides of the body, we are essentially moving the shoulder in flexion. This is not a powerful nor particularly healthy way to move so much weight. When we do this repeatedly, the bicep tendon (usually the short head at the attachment with the coracoid process of the shoulder blade) will often be damaged. This manifests as pain or soreness in the front of the shoulder. There is a common belief that keeping the elbows close to the body uses the triceps more than if the elbows were wider. This is not true for the simple reason that the triceps straighten the elbow, and the elbow is doing a similar action in both versions. The big impact is on the shoulder and what muscle group you use when doing a pushup or chaturanga motion. IN CONCLUSION There is nothing inherently wrong with keeping the elbows close to the body and flexing the shoulder. The problems arise when we do this with our entire body weight and do it repetitively. This is how injury usually happens. Consider making the elbows wider, which will strengthen the huge pectoralis major muscle as well as be safer for the smaller muscles of the shoulder. Happy, healthy practicing! 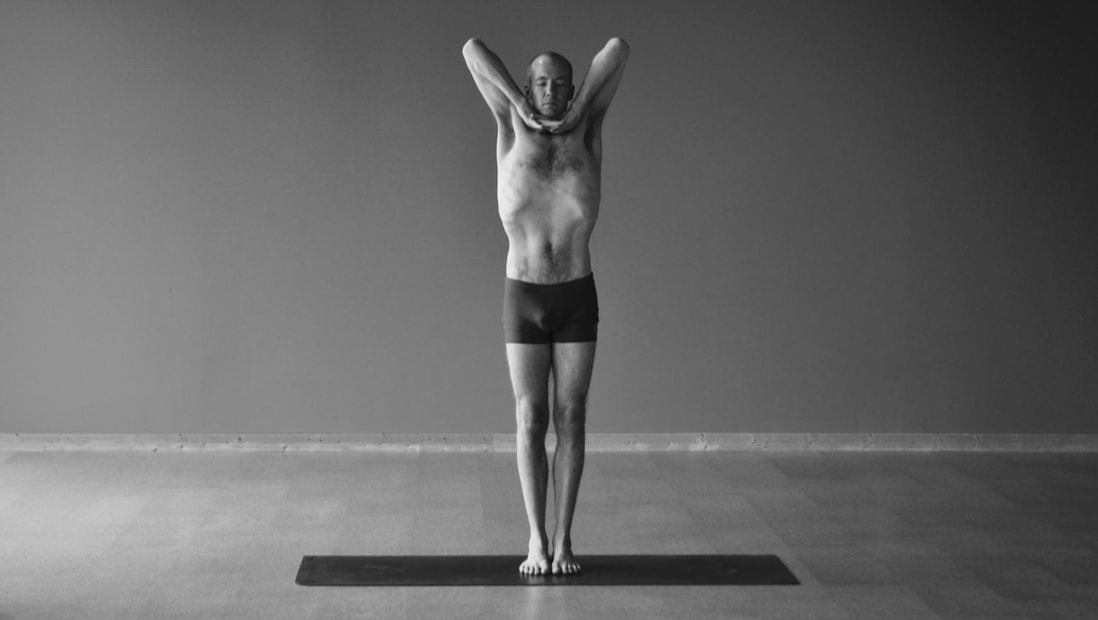 This is part of a series about Injuries In Yoga. Two common injuries in yoga happen in the shoulder. One is in the front of the shoulder---the biceps tendon---which we will address next time. The other is in the top of the shoulder, called impingement. It happens when the arm lifts up high; the arm bone can bump against the edge of the shoulder blade, called the acromion, and damage the tendon there.
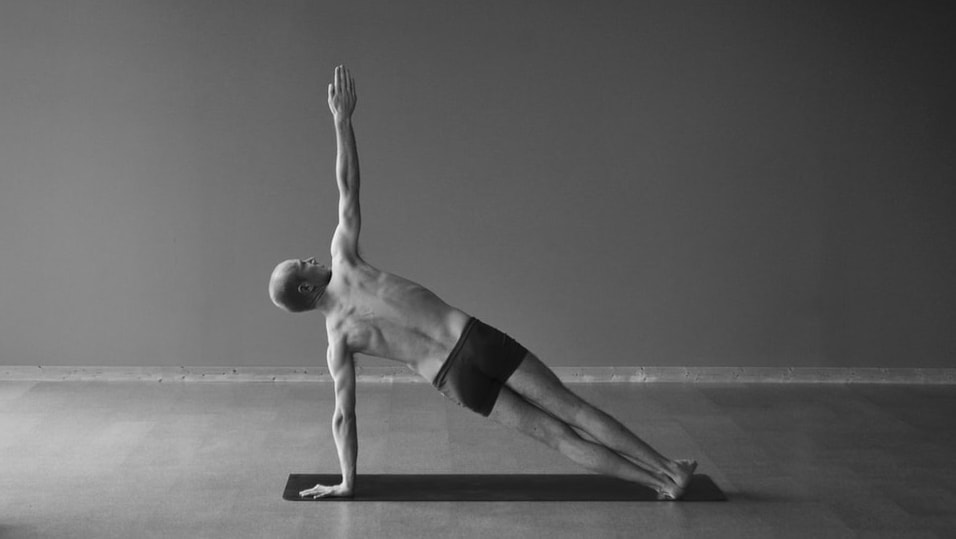
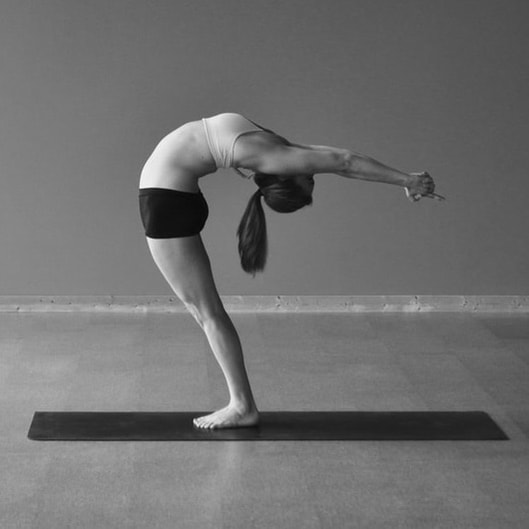
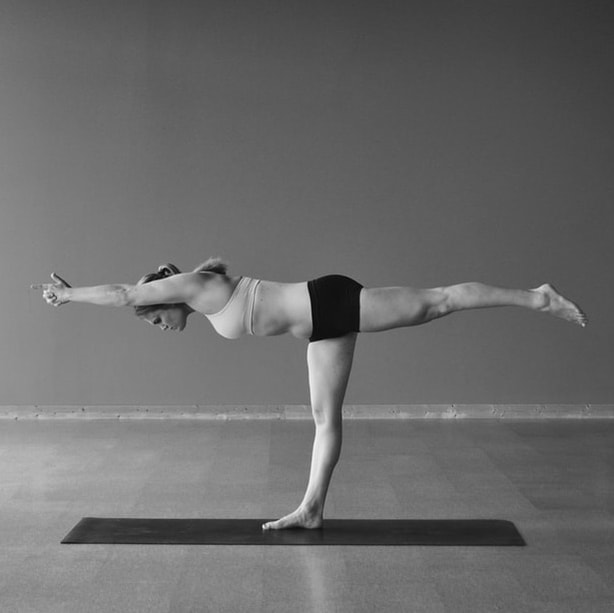
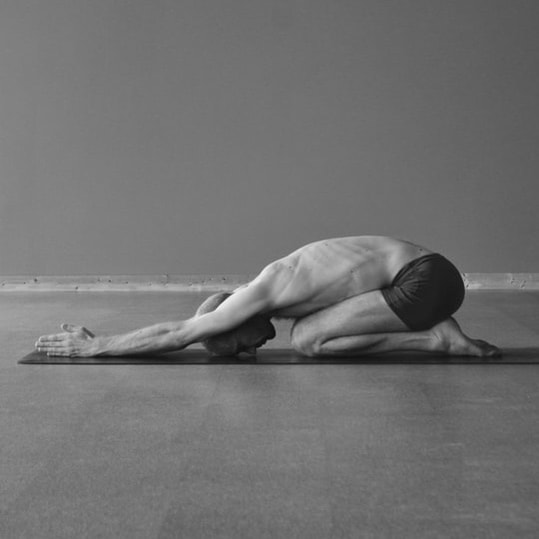
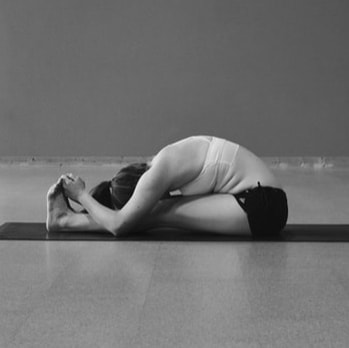
 HOW THIS CAN HAPPEN In yoga, this happens most often when we force the arms overhead. Think of any time you link your hands together and then try to straighten your arms using force. As pictured below, it happens in Half Moon Backbend, Half Moon Sidebend, Balancing Stick and Half Tortoise, among others. (It also happens in Downward Facing Dog.) When we force our arms to straighten overhead, we usually use the triceps, a muscle mainly of the elbow, to compel movement in the shoulder. This is where we get into trouble and impingement can happen. You will feel a 'pinching' sensation in the top and outside of your shoulder. This is the bones bumping into each other, damaging the soft tissue. If the shoulders become injured this way, they will be painful whenever lifting the arms sideways, and the breathing exercise pictured at the top will cause pain.
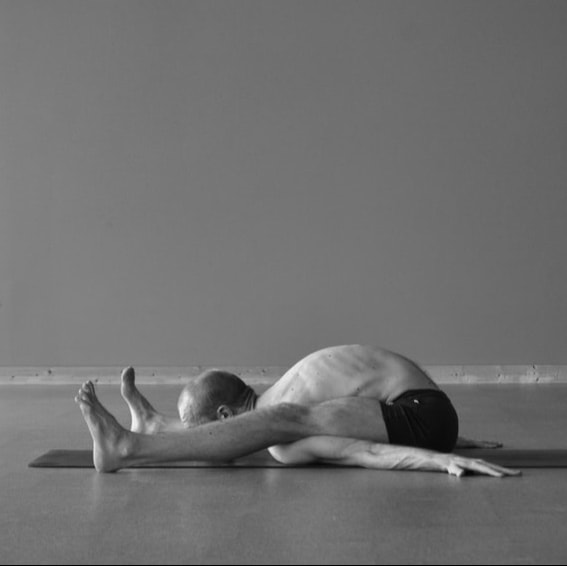
 HOW TO HELP The simplest and most effective way to avoid this injury is to not link your hands together. Just place them side by side without interlacing the fingers. Interlacing the fingers and forcing the arms straight overhead is the easiest way to create the injury. Or don't lift your arms overhead (pictured below left). Most postures can be done quite effectively without the arms overhead. All of the positions pictured above don't require the arms to get the primary benefit. Alternatively, you can lift your arms forward and up (pictured below) instead of out to the side. This will help the shoulder blades move into the proper position and keep the shoulders healthy. In the breathing exercise, pictured at the top, you can keep your elbows lower, not lifting them higher than the shoulders. This will prevent further irritation of this area. To build strength in the area, postures like Full Locust will help (pictured below right). By pulling the shoulders back and together, we build strength in the back of the shoulder to help stabilize and balance the joint.
CONCLUSION
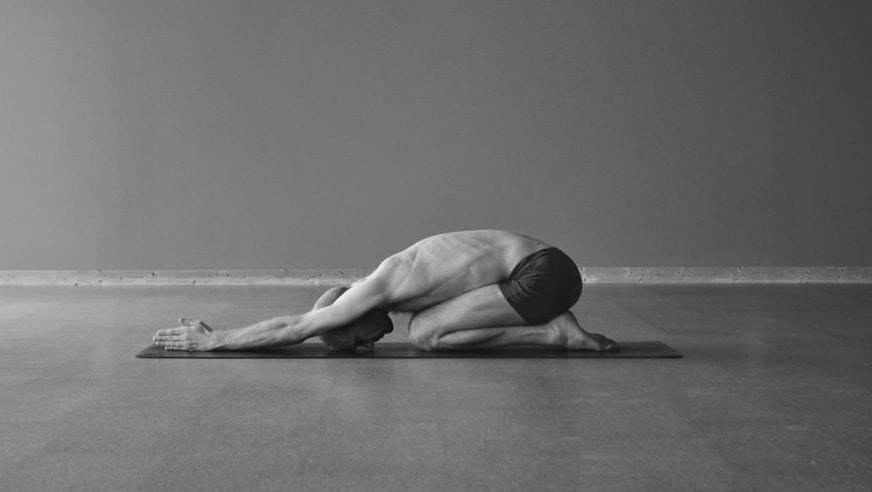
The moral of the story is that we should be aware and careful when lifting the arms overhead, especially if we are gripping the hands together and straightening with force. If there is a 'pinching' sensation in the top of the shoulder, back off immediately. There is nothing there to 'stretch', and it is likely that we are impinging our supraspinatus tendon. Try adjusting your approach to the posture and using your shoulders a little differently. Happy, healthy practicing. 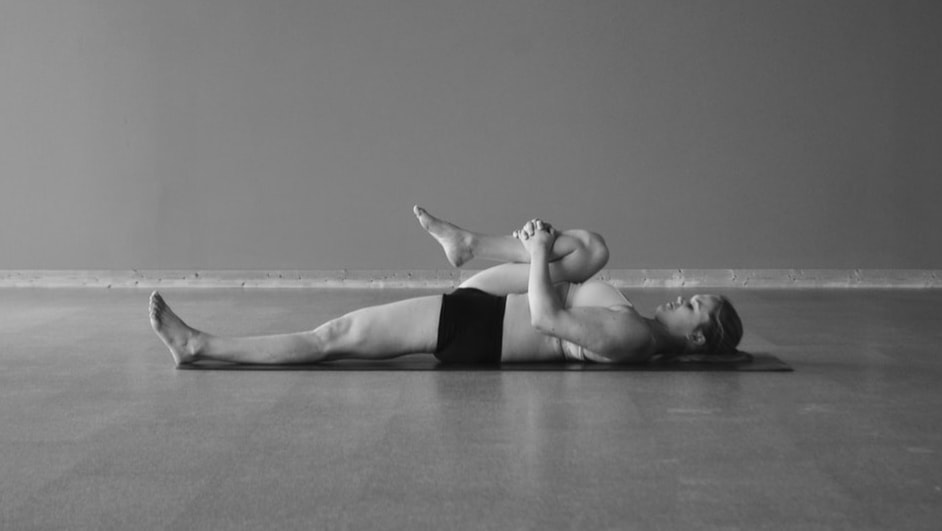 This is part of a series about Injuries In Yoga. The second most common injury we see in the yoga world is of the hip. The damage happens when the hip bends (flexes) significantly. The thigh bone can bump against the bone of the pelvis and hip socket, crushing the cartilage there. This is called hip impingement. The injury generally happens in three progressive stages that may take months or years to develop. In the first stage, there is a slight or moderate pinching sensation as we pull the leg into the chest or rest the body onto the leg with gravity. This pinch is not the result of muscular engagement or tissue stretching, but of bone resting on bone and squishing the cartilage between. (There is a somewhat common instruction to 'feel a pinching sensation in the hip' in some postures. We recommend against this, for obvious reasons.)
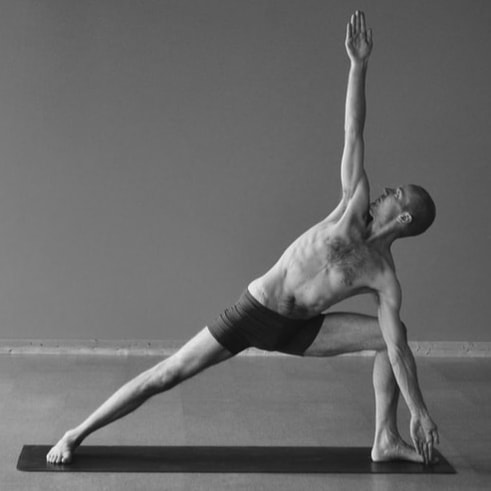
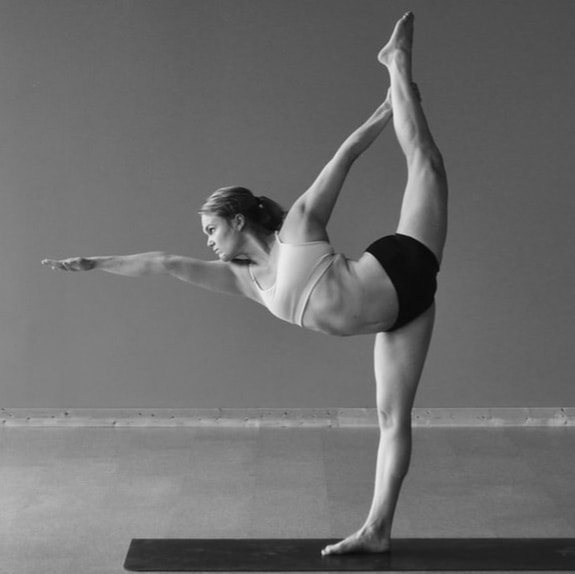
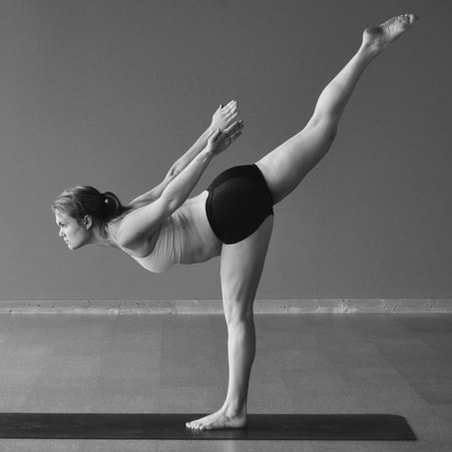
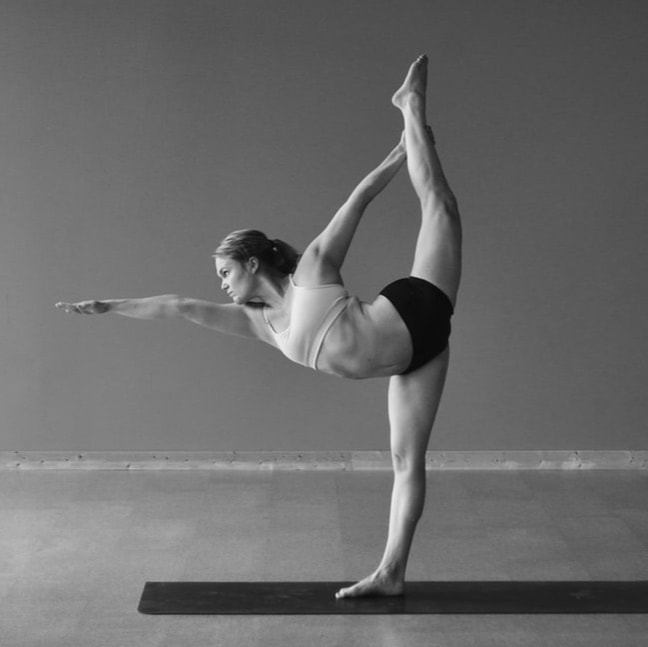
If we continue to damage the cartilage beyond the second stage, in the third stage it can actually tear and pull away from the hip socket. This is called a labral tear, because the cartilage ring around the hip socket is the labrum. This injury can be quite painful, making it excruciating to do something as simple as walk. Like in the second stage, not only will the hip joint itself hurt, but the muscles of the thigh will struggle to function properly. Common postures that are in danger of causing this injury are those that involve deep hip flexion, which is bending of the hip joint. These include Wind Removing (pictured above), Bikram Triangle, Standing Bow, Half Tortoise, Separate Arms Balancing Stick and Spinal Twist (Ardha Matsyendrasana). Look at the position of the hip in all these postures. Notice that the deep flexion can cause the thigh bone to bump into the pelvis.
How can we avoid, prevent or heal this injury? As with most things, prevention is the most effective method, as it will keep the body healthier and pain-free. To prevent this injury, pay close attention in any of these postures where your hip is deeply flexed. If you feel a pinching or pressure in the top/front of your hip, back off a bit. It can be challenging to separate this sensation from a stretching or engaged muscle, but the differentiation is quite clear once you notice it.
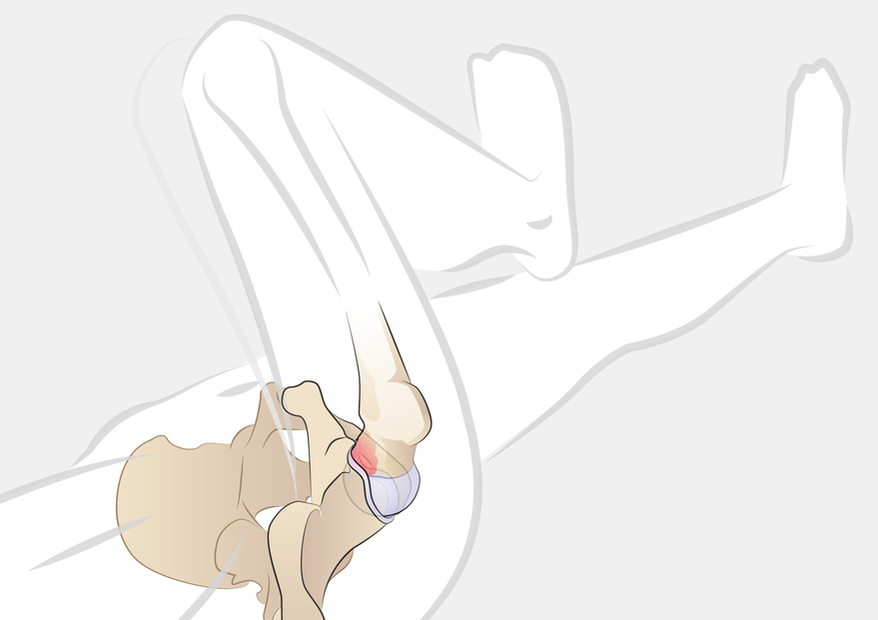
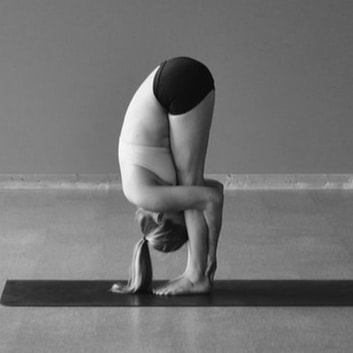
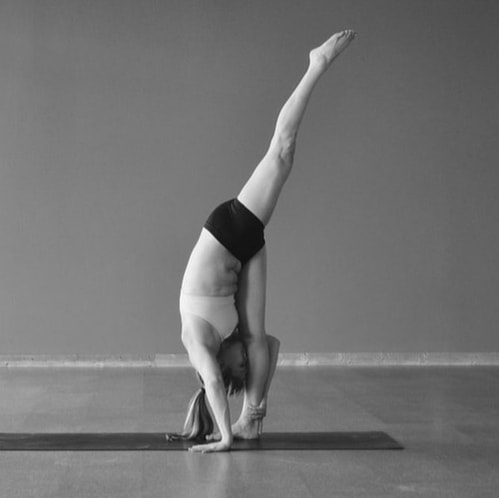
Anytime we use the arms to pull the leg deeper toward the pelvis, use great care! This is taking the hip joint past its normal range of motion, and is a common way to injure the hip. In most (perhaps all) situations, pulling will increase the risk of injury. Healing damaged hip cartilage is difficult. If you are only in Stage 1 or Stage 2, backing off of the postures will likely allow the body to heal. You will need to be conservative with the hip for awhile, at least six weeks. If you have a torn labrum, the conversation gets more complicated, as most will recommend surgical repair. The cartilage doesn't have a great blood supply, so it has trouble healing on its own. There are some stories of non-surgical success, but they are few and far-between. For us, the moral of the story is to be careful and gentle. Most people practice yoga to improve their health, and injury is the exact opposite of that.  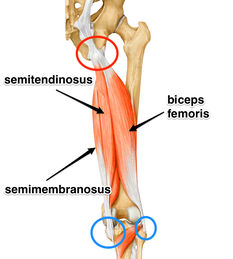 This is part of a series about Injuries In Yoga. The single most common injury that we see in the yoga world is a hamstring attachment injury. It happens due to over-stretching the hamstrings. Since so many postures and exercises target this muscle group on the back of the thighs, what often ends up happening is we over-stretch and the tendon that attaches the hamstrings to the sit bones gets damaged. Quite often, we mistake this new, intense sensation for a "deeper" hamstring stretch, so we continue to push (or more often pull). This makes it worse, and many of us don't realize there is an injury until serious damage has been done. Stretching the hamstrings has become central to many styles of yoga. Like many other physical elements of modern practice, this emphasis comes from gymnastics, contortion and dance. In any given class, we may stretch the hamstrings from numerous positions: standing, seated, legs together, legs split, one leg, both legs, etc. This injury creates pain at the point where the hamstrings attach to the sit bones (ischial tuberosities), at the base of the pelvis in the back, pictured to the right and circled in red. It can be painful in forward folding positions, and may be sore after class so that it hurts to sit down. It is sometimes called "yoga butt". This injury is so common that almost half of yoga practitioners---men and women---have it currently or have had it in the past. Common postures that could strain the hamstrings are: Hands to Feet, Standing Separate Legs Stretching (pictured above), Standing Bow, Standing Splits, Stretching, Separate Legs Stretching and Tortoise, etc. Take a moment to notice the similarities in these positions, pictured below. They all tilt the pelvis forward with relationship to the femur (thigh bone). This makes the hamstrings long, which is why we feel the "stretching" in the back of the leg. The deeper these postures are, and the harder we push them, the more likely it will be to damage the attachment of the hamstrings.
HOW TO HELP
First and foremost: rest. I know you don't want to hear this, and resting can be a real challenge for the mind and ego. This injury can take months or years to heal, and the more we aggravate it the longer it will take. Avoid forward folds for several months. Seriously! You can still do lots of other exercises and postures, but avoid forward bending of the hip for awhile. DO NOT STRETCH YOUR HAMSTRINGS! Second, don't overstretch the hamstrings, even after you're healed. The natural range of motion of the hamstrings only gets the femurs (thigh bones) to about 90 degrees with the pelvis when the knees are straight. This means that the vast majority of contortion-influenced yoga postures that "stretch" the hamstrings take it too far, which is why injury is so common. You might not be able to do Standing Splits with the same picturesque beauty, but you will be able to walk and sit without pain. Third, strengthen and shorten the hamstrings. We did a whole blog on this, where we explain a handful of postures and exercises that will make the legs strong and help prevent injury. These include Balancing Stick, Squatting, Bridge and Jastiasana. IN CONCLUSION The most important thing to take away from this is that you can get hurt from yoga practice. If you have pain at the back of your hip, the top of your hamstrings, at or near your sit bones, and this is exacerbated when you do forward folding postures, STOP IMMEDIATELY! It is very likely that you are damaging the upper attachment of the hamstrings. Take the time to let it heal, and then perhaps adjust your approach to the physical postures so that they have less likelihood of injury.  Over the past few months, we have heard increasingly loud calls for talk about injury in yoga. So many students are hurt or have pain, and they don’t know what it is, how it happened or how to fix it. Some are even told by their teachers to push through the sensation to continue deepening the physical postures. After all, these exercises and postures are supposed to be healing, right? When we describe the common yoga injuries, students are both 1) shocked that you can get hurt doing yoga, and 2) surprised to hear us describing the pain and difficulty that they experience.
Yes, yoga can hurt you. It’s true. If you’ve practiced the physical forms of yoga that are popular in the West for more than a few months, chances are you’ve been injured or know someone who has. This is not to say that physical yoga practices are inherently dangerous or should be avoided. The same risk is present in virtually any physical activity: basketball, running, bowling. Anytime we use the body in a repetitive way and push it to go farther and farther, the risk of injury is quite high. We generally don’t know the limits of our capabilities until we go too far! Yoga is mostly thought of as a healing, healthy and therapeutic form of exercise, not to mention safe. Since most of us approach the practices thinking they will help us, we overlook the possibility for injury until it’s too late. It is especially true in the yoga world, where we want to believe that it only has the ability to make us better, more open, happier, peaceful versions of ourselves. The idea that any of these practices could injure our bodies, nervous systems or minds feels foreign and even contradictory. So all too often we disregard it. Until we get injured. Even then, we may think it was our fault, that we weren’t doing the practice right, because a “healing” practice couldn’t possibly be dangerous. But injuries are quite common in yoga. And each style has its own tendency toward certain imbalances, as the stress and repetition in each practice are a little different. We are going to do a whole series of posts about Injuries In Yoga. We will go into some depth about the most common injuries we see, which include hamstring attachment strain, hip impingement and labral tear, meniscus tear in the knee, supraspinatus damage in the shoulder, bicep tendon strain in the shoulder, sacroiliac instability in the low spine, and neck pain in the base of the neck. All of these can be created or exacerbated by physical yoga practices. For now, we want you to know that yoga can injure you, especially if you think it never will. Always take care and try to understand what you’re doing and why. Some intense sensations are safe and even beneficial, while others are not. Use caution and ask your teacher if you’re not sure. If they tell you that you won’t hurt yourself in yoga, get a new teacher. If you have an injury or had one in the past that you’d like to tell us about, please comment or message. Let us know your experience!  Hardly a day goes by when someone doesn't ask us, "Is Bikram Yoga the same as Ghosh Yoga?" It is a valid and interesting question, as plentiful yoga systems seek to separate themselves from the competition with novel methods and attributes. The two methods are closely related, since Bikram Choudhury learned at Ghosh's College. But there are some fundamental differences that keep the two systems from being synonymous.
First, let's look at what they have in common. THE POSTURES Most of the exercises in Bikram Yoga are recognizably from the Bengal region of India, where Ghosh's College is located. The previous students of Ghosh taught these same postures and exercises like Half Tortoise, Rabbit and Standing Head to Knee. And several of the postures, like Stretching, Cobra, Locust, Bow and Corpse, are traditional yoga asanas found in older texts. Notably missing from both Bikram and Ghosh yogas are exercises like Up-dog, Down-dog and Warriors One and Two which come from South India and have made their way into most vinyasa yoga styles. STILLNESS Another element shared between Bikram and Ghosh yogas is the alternation of effort and rest. Each posture is held in stillness for a brief period and followed by an equal portion of relaxation. While standing, the practitioner simply stands still, though some of the older Ghosh students insisted on lying down between exercises. During postures on the floor, relaxation happens by assuming the Corpse posture. This is a distinctive element of these styles, setting them apart from the popular flowing methods that link stationary positions with fluid movements and Sun Salutations. THERAPEUTIC INTENT It can seem obvious, but both Bikram and Ghosh yogas are fundamentally designed to help the student be healthy. This is similar to all the yoga in Bengal, where the postures are done to help the organs, circulation, digestion or some other element. They generally have a therapeutic purpose. This intention can be contrasted with many vinyasa styles of yoga that originated in the performative gymnastics of Mysore. Those styles, like Ashtanga Vinyasa and its descendant "flow" methods, have become more therapeutically focused over the ensuing decades. But the origin of flowing yoga was performative. Now, let's look at what is different between Bikram Yoga and Ghosh Yoga. SET INSTRUCTIONS The method of Bikram's yoga is largely defined by its style of instruction, the rote utterance of prewritten commands. Teachers of the style can be judged by the quality of their "dialogue." Many paraphrases and copycats have popped up, but Bikram's original is still considered by most to be the gold standard. This rote instructional style is nowhere present in the teachings of Ghosh Yoga, where the majority of verbal instruction is simply counting the duration of each exercise. HEAT Also central to Bikram's style is a heated room, a characteristic that finds no expression in other manifestations of Ghosh's style. In India, they turn on fans or air conditioning when the day gets hot, or they forego the scorching parts of the day altogether. A SET SEQUENCE The two differences above are somewhat peripheral to the essence of the methods. The irreconcilable difference between these two systems is Bikram Yoga's unchanging set of exercises. The same 26 postures are "prescribed" for every student no matter their age, ability, experience, goals or ailments. Central, indeed fundamental, to the Ghosh system is a unique prescription for each student. It would be unheard of to assign the same practices to different people, especially without learning their strengths and weaknesses. Because Bikram Yoga is defined by its specific and repeated set of postures, and Ghosh Yoga is defined by its attention to the individual, it is impossible to conclude that Bikram Yoga and Ghosh Yoga are the same thing. They certainly share several key elements, namely their postures, the alternation of effort and relaxation, and therapeutic intent. But the defining characteristics of Bikram Yoga like rote instruction, added heat and especially a single unchanging set of exercises separate it substantially from Ghosh Yoga. 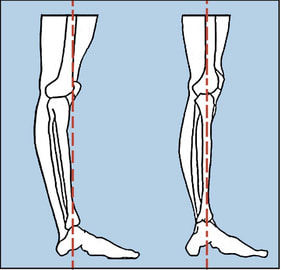 "Locking the knee" is a concept in yoga that was popular in the 60s and 70s, including the styles of BKS Iyengar and Bikram Choudhury. It originally comes from weightlifting, where full extension of the knee joint and concerted contraction of the quadriceps are paramount. You will still hear weightlifters talk about "locking out" to refer to the full straightening of a joint that is under stress.
For the most part, this concept has dwindled in the yoga world due to the confusion it causes. There are at least 3 different meanings to the phrase "lock the knee," depending on what position you are in and who you're talking to. An anatomist has a different definition than a Bikram Yoga teacher. These are the three meanings: 1. CONTRACT THE QUADRICEPS This is the original meaning of the term as it comes from weightlifting and bodybuilding. Used in quadricep-heavy exercises like squats, "lock the knee" meant to straighten the knee as much as possible by squeezing the quadriceps with great force. In the yoga world, this has also become a way to relax or stretch the hamstrings, since engaging the quads naturally causes the hamstrings to disengage. In addition, it is sometimes believed that engaging the quadriceps, which causes the kneecap to lift up, will protect the knee joint from hyperextension. (It won't.) 2. RESTING THE FEMUR ON THE TIBIAL SHELF Anatomically speaking, a normal knee has the ability to hyperextend by a few degrees. It can go past the 180 degrees of a straight leg by about 4-6 degrees. When we are standing and our legs are bearing weight, we have the ability to hyperextend the knees and "rest" them on the tibial shelf. They settle back and the muscles of the leg relax, allowing us to stand for long periods of time without using much energy. When the knees are resting in this manner, they are "locked." To unlock them, there is a specific muscle (the popliteus) that unlocks the knees before they return to normal function. This definition of a "locked knee," which is essentially slight hyperextension, is often conflated with the first: contracting the quadriceps. Unfortunately, the combination of hyperextension and contracted quadriceps will accentuate the knee's tendency to hyperextend and possible create instability. 3. ENGAGING ALL THE MUSCLES AROUND THE KNEE Normally, the contraction of the quadriceps is accompanied by a relaxation of the hamstrings, and vice versa. It allows for effortless movement of the knee back and forth. But this relationship can be overridden with conscious effort and control, contracting both sets of opposing muscles simultaneously. In yoga parlance this is called a bandha, a "lock." When opposing muscle groups around a joint are consciously contracted together, the joint does not move. On the contrary, it becomes immobile and quite stable. This is often done to create stability and pressure gradients that effect the blood and heat flow in the body. IN CONCLUSION As you can see, the phrase "lock the knee" can mean a handful of different things. And it is important to note that the interpretations can conflict with one another. The first involves engaging the quadriceps while relaxing the hamstrings; the second involves relaxing both the quadriceps and the hamstrings; and the third involves engaging both the quadriceps and the hamstrings. |
AUTHORS

Scott & Ida are Yoga Acharyas (Masters of Yoga). They are scholars as well as practitioners of yogic postures, breath control and meditation. They are the head teachers of Ghosh Yoga.
POPULAR- The 113 Postures of Ghosh Yoga
- Make the Hamstrings Strong, Not Long - Understanding Chair Posture - Lock the Knee History - It Doesn't Matter If Your Head Is On Your Knee - Bow Pose (Dhanurasana) - 5 Reasons To Backbend - Origins of Standing Bow - The Traditional Yoga In Bikram's Class - What About the Women?! - Through Bishnu's Eyes - Why Teaching Is Not a Personal Practice Categories
All
Archives
May 2024
|


 RSS Feed