 Therapeutic exercises are simple movements of the body that take the major joints and muscles through their functional range of motion. They are not fancy or particularly beautiful to look at, but they are quite useful to keep the body strong, mobile and painless.
These exercises are the basis for the yoga method taught at Ghosh's Yoga College in Kolkata, India. They are central to the goal of building and sustaining health. Because modern life is full of imbalances — lots of sitting, hunching and looking at screens — our bodies and minds get out of whack pretty often. We get tight hips, tight lower backs, achy necks, tight shoulders, etc. Most often, these tight achy areas are directly linked to an imbalance in a major joint. On the opposite side of the tightness is weakness. We use these Therapeutic Exercises as precisely as we can to target the issues in the body. Some exercises are good for balancing the lower spine — like the Torso Lift and Leg Lift — while others are good for balancing the upper spine — like Cobra and Full Locust. Still other exercises are useful for balancing the hip — like Squatting and Hip Hinge — or the shoulders — like Butterfly or Chest Expansion. After years of consideration and discussion with the Ghosh family, we are finally releasing a book that contains more than 40 Therapeutic Exercises. We try to explain the use of each exercise as precisely as possible, both what it does in the body and what imbalances it is good for. At the end of the book are a handful of practice sequences. You may know that 'sequences' are unusual in therapeutic yoga, as each person is different and gets a unique prescription. But we have identified a few of the most common issues and imbalances and provided sets of exercises to target them. We truly hope that this book will be useful to you, whether you are a beginning student, have an injury, are a yoga teacher, a yoga therapist or a historian of this method. The book is available for preorder here. It will ship on December 7.
4 Comments
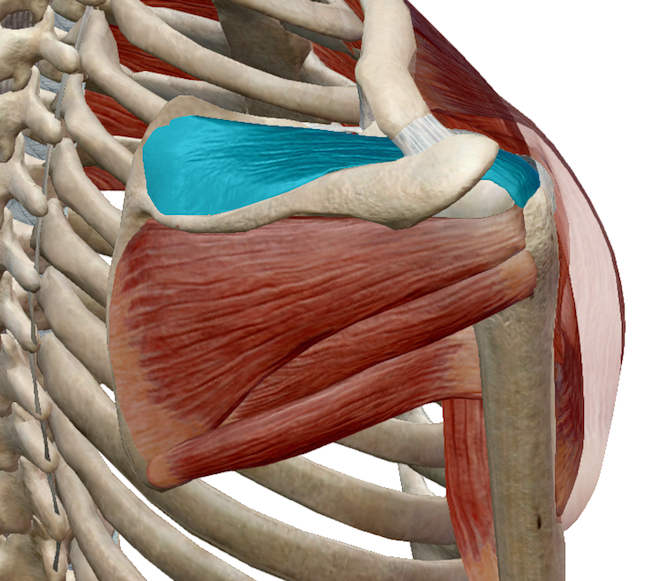
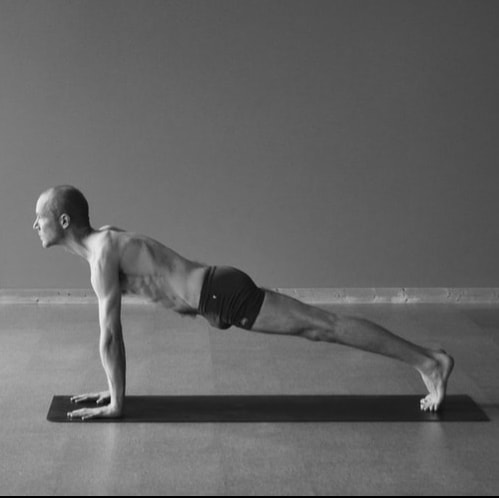
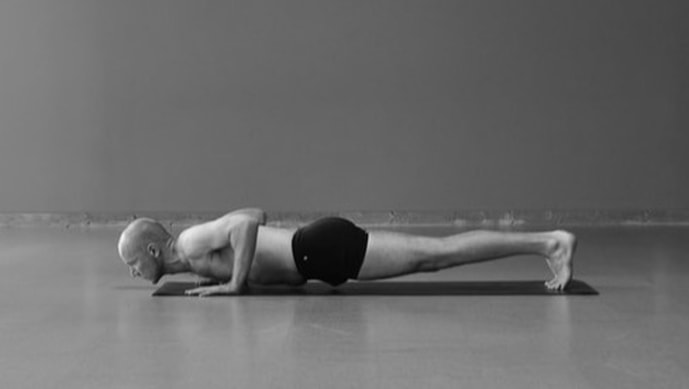 This is part of a series about Injuries In Yoga. Last month we wrote about the common shoulder injury Shoulder Impingement. The other common injury to the shoulder happens in the front, where the short head of the biceps muscle attaches to the shoulder blade, a biceps tendon strain. This injury is most common in Ashtanga Vinyasa and subsequent 'flowing' yoga styles that incorporate a lot of Sun Salutations and chaturangas. The shoulder can't do this action very well, and the biceps become strained before too long. 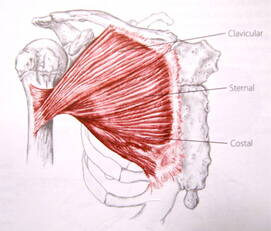 Pectoralis major ("pec") Pectoralis major ("pec") To understand this injury, we have to talk about shoulder mechanics and the muscles that move the arm. PECTORALIS MAJOR & ADDUCTION One of the biggest and most powerful muscles of the shoulder is the pectoralis major, commonly known as the 'pecs' or just the 'chest muscle', pictured to the left. It connects the arm (humerus) directly to the middle of the chest. Its main function is to pull the arm toward the chest in an action called adduction. Try it: hold your arm out to the side (as pictured below, labeled adduction), then bring your arm toward the center, so you end up with your arm pointing forward. As you do this, you will feel your 'pec' engage. When you apply this motion to something like a pushup, the arms need to be away from the body, so the pushup motion will be pulling the arm inward toward the chest. Simply put, this means keeping your elbows away from the body. This is the safest way to do any pushup motion. 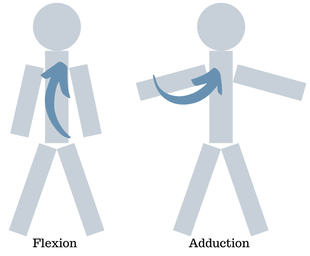  BICEPS & FLEXION
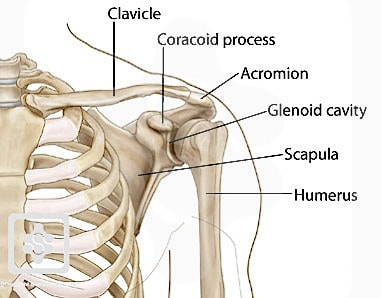
In contrast, if we start with our arms down by the sides and lift them up until they point forward, this is called flexion (pictured above, labeled flexion). When we lift the arm like this, the pec doesn't get activated much, so the work is done by much smaller muscles like the anterior deltoid (the front of the shoulder cap) and the biceps. The biceps cross two joints; they bend the elbow and also flex the shoulder. But they don't have the power to move the body's entire weight. When we do pushups or chaturangas with the elbows close to the sides of the body, we are essentially moving the shoulder in flexion. This is not a powerful nor particularly healthy way to move so much weight. When we do this repeatedly, the bicep tendon (usually the short head at the attachment with the coracoid process of the shoulder blade) will often be damaged. This manifests as pain or soreness in the front of the shoulder. There is a common belief that keeping the elbows close to the body uses the triceps more than if the elbows were wider. This is not true for the simple reason that the triceps straighten the elbow, and the elbow is doing a similar action in both versions. The big impact is on the shoulder and what muscle group you use when doing a pushup or chaturanga motion. IN CONCLUSION There is nothing inherently wrong with keeping the elbows close to the body and flexing the shoulder. The problems arise when we do this with our entire body weight and do it repetitively. This is how injury usually happens. Consider making the elbows wider, which will strengthen the huge pectoralis major muscle as well as be safer for the smaller muscles of the shoulder. Happy, healthy practicing! 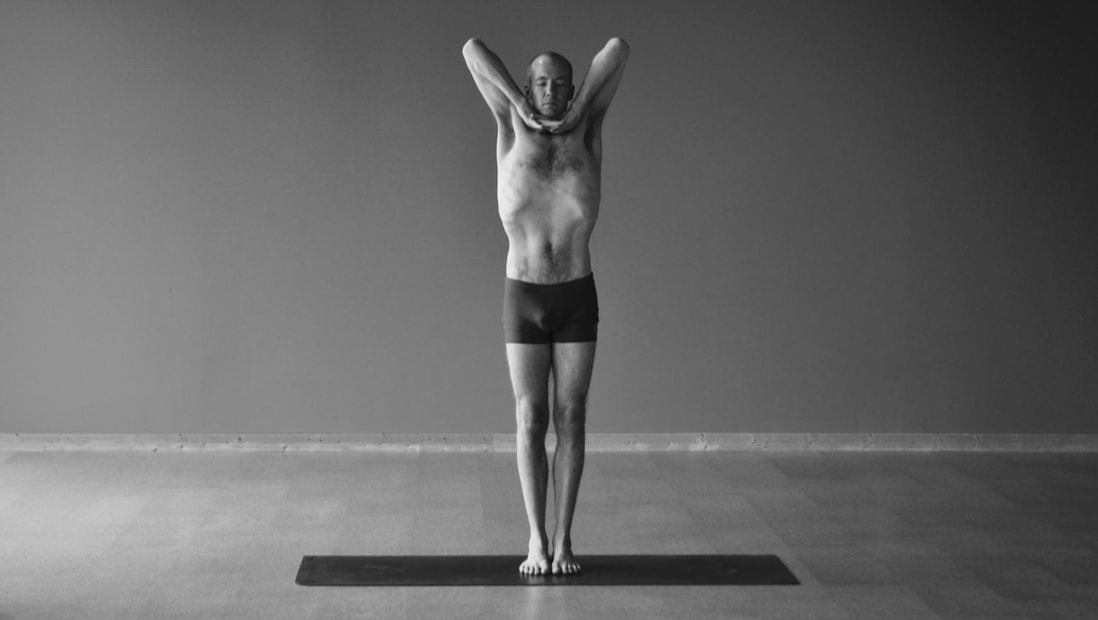 This is part of a series about Injuries In Yoga. Two common injuries in yoga happen in the shoulder. One is in the front of the shoulder---the biceps tendon---which we will address next time. The other is in the top of the shoulder, called impingement. It happens when the arm lifts up high; the arm bone can bump against the edge of the shoulder blade, called the acromion, and damage the tendon there.
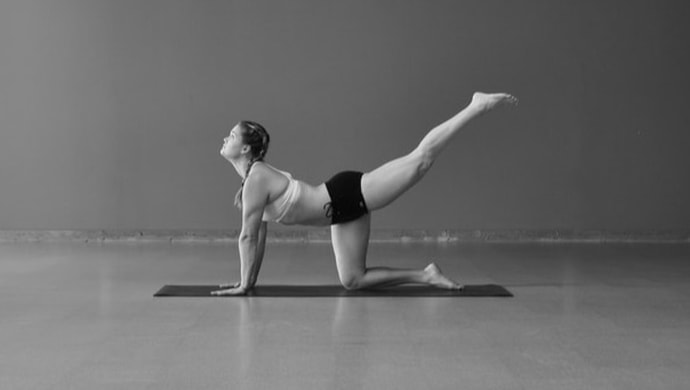
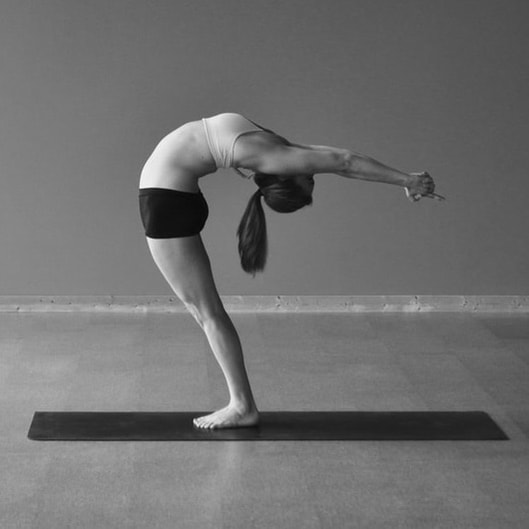
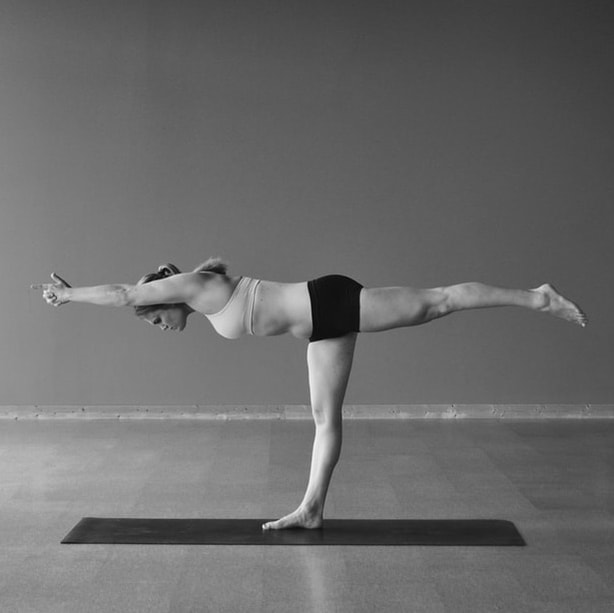
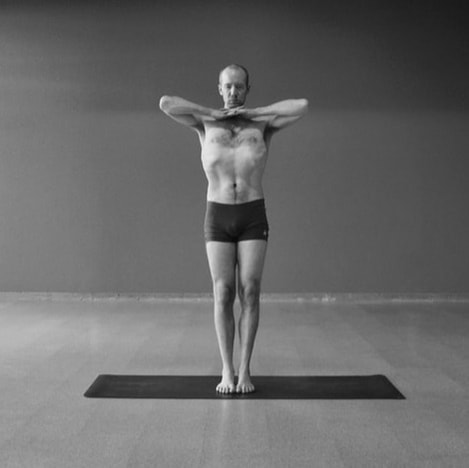
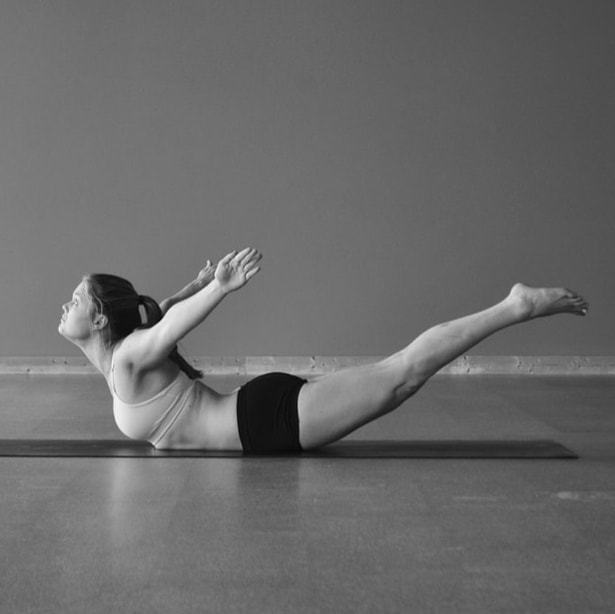
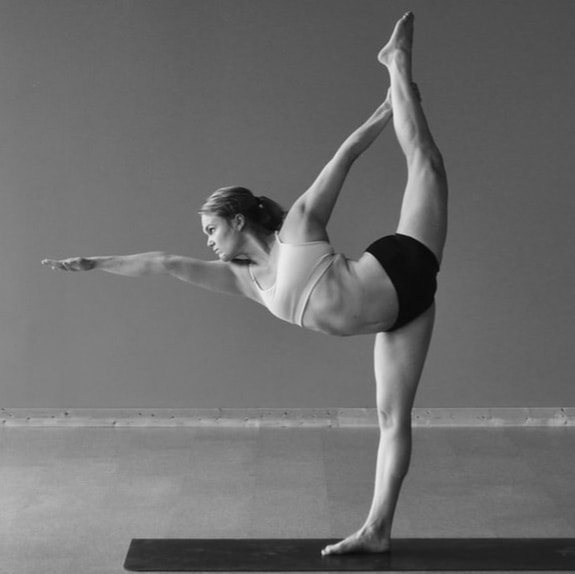
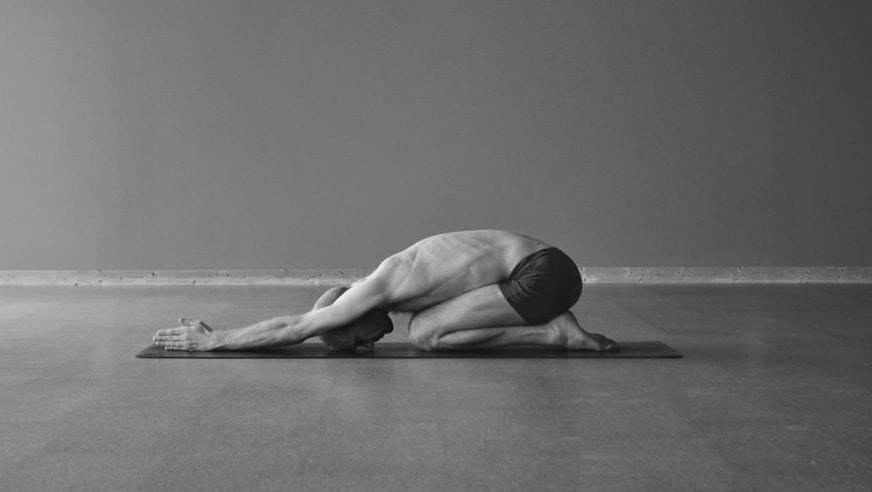
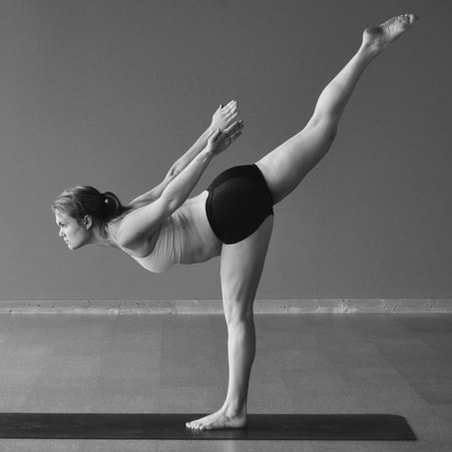
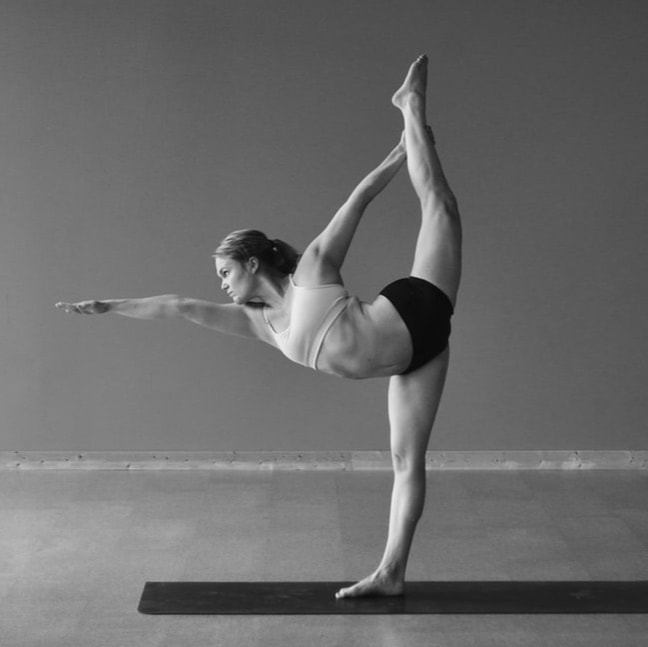
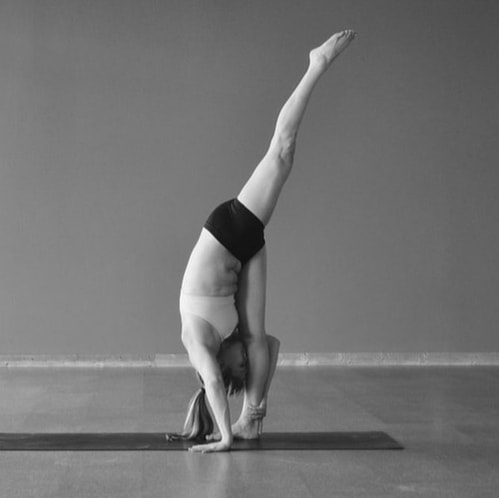
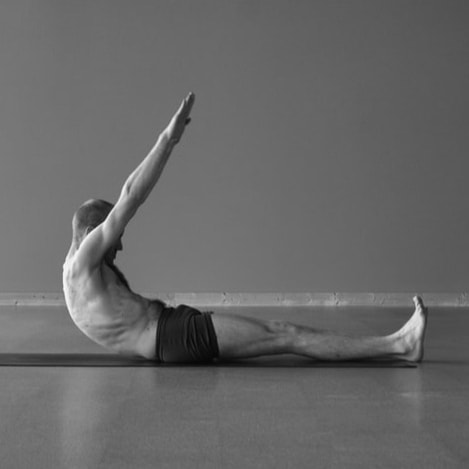
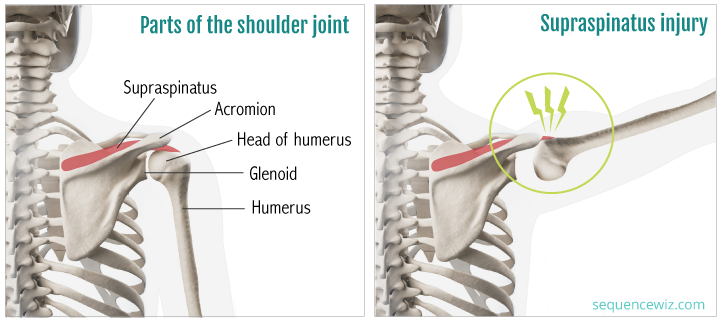 HOW THIS CAN HAPPEN In yoga, this happens most often when we force the arms overhead. Think of any time you link your hands together and then try to straighten your arms using force. As pictured below, it happens in Half Moon Backbend, Half Moon Sidebend, Balancing Stick and Half Tortoise, among others. (It also happens in Downward Facing Dog.) When we force our arms to straighten overhead, we usually use the triceps, a muscle mainly of the elbow, to compel movement in the shoulder. This is where we get into trouble and impingement can happen. You will feel a 'pinching' sensation in the top and outside of your shoulder. This is the bones bumping into each other, damaging the soft tissue. If the shoulders become injured this way, they will be painful whenever lifting the arms sideways, and the breathing exercise pictured at the top will cause pain.
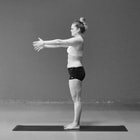
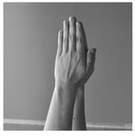 HOW TO HELP The simplest and most effective way to avoid this injury is to not link your hands together. Just place them side by side without interlacing the fingers. Interlacing the fingers and forcing the arms straight overhead is the easiest way to create the injury. Or don't lift your arms overhead (pictured below left). Most postures can be done quite effectively without the arms overhead. All of the positions pictured above don't require the arms to get the primary benefit. Alternatively, you can lift your arms forward and up (pictured below) instead of out to the side. This will help the shoulder blades move into the proper position and keep the shoulders healthy. In the breathing exercise, pictured at the top, you can keep your elbows lower, not lifting them higher than the shoulders. This will prevent further irritation of this area. To build strength in the area, postures like Full Locust will help (pictured below right). By pulling the shoulders back and together, we build strength in the back of the shoulder to help stabilize and balance the joint.
CONCLUSION
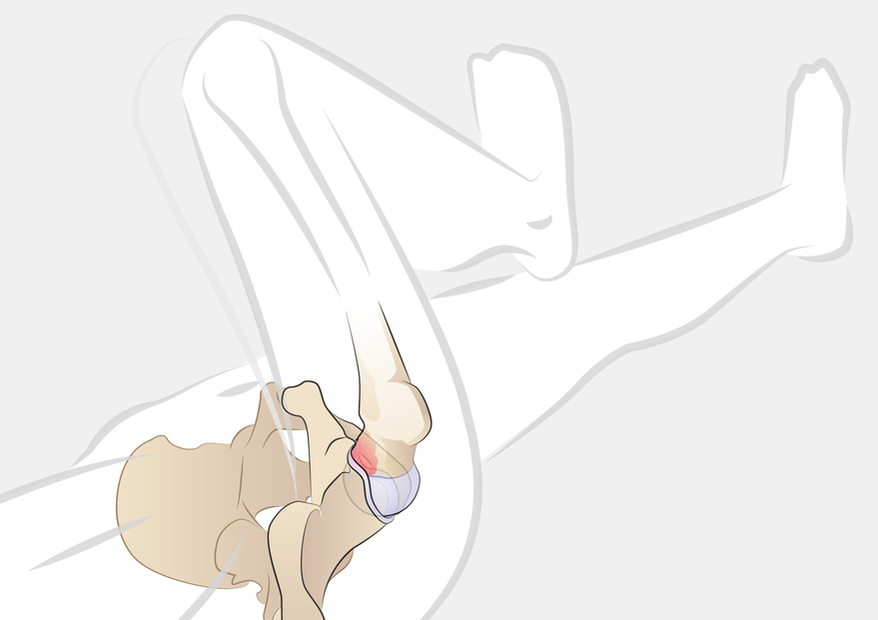
The moral of the story is that we should be aware and careful when lifting the arms overhead, especially if we are gripping the hands together and straightening with force. If there is a 'pinching' sensation in the top of the shoulder, back off immediately. There is nothing there to 'stretch', and it is likely that we are impinging our supraspinatus tendon. Try adjusting your approach to the posture and using your shoulders a little differently. Happy, healthy practicing. 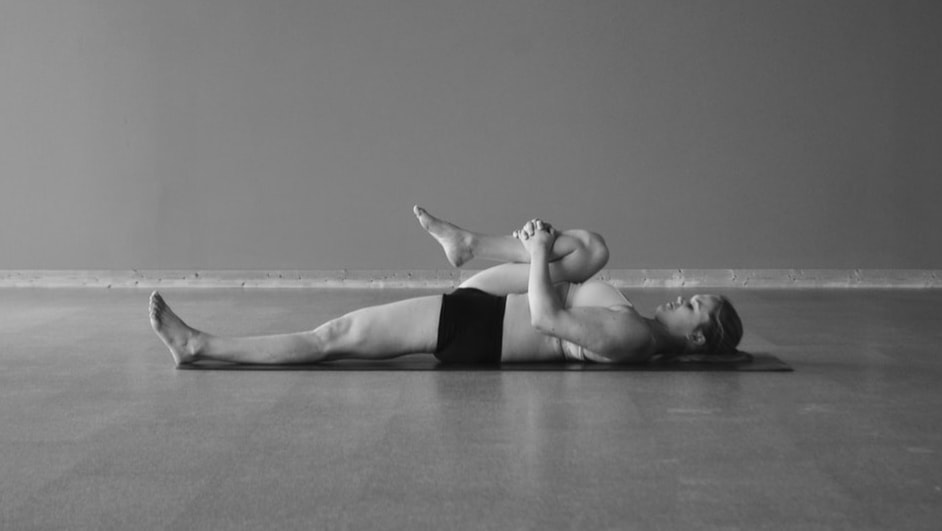 This is part of a series about Injuries In Yoga. The second most common injury we see in the yoga world is of the hip. The damage happens when the hip bends (flexes) significantly. The thigh bone can bump against the bone of the pelvis and hip socket, crushing the cartilage there. This is called hip impingement. The injury generally happens in three progressive stages that may take months or years to develop. In the first stage, there is a slight or moderate pinching sensation as we pull the leg into the chest or rest the body onto the leg with gravity. This pinch is not the result of muscular engagement or tissue stretching, but of bone resting on bone and squishing the cartilage between. (There is a somewhat common instruction to 'feel a pinching sensation in the hip' in some postures. We recommend against this, for obvious reasons.)
If we continue to damage the cartilage beyond the second stage, in the third stage it can actually tear and pull away from the hip socket. This is called a labral tear, because the cartilage ring around the hip socket is the labrum. This injury can be quite painful, making it excruciating to do something as simple as walk. Like in the second stage, not only will the hip joint itself hurt, but the muscles of the thigh will struggle to function properly. Common postures that are in danger of causing this injury are those that involve deep hip flexion, which is bending of the hip joint. These include Wind Removing (pictured above), Bikram Triangle, Standing Bow, Half Tortoise, Separate Arms Balancing Stick and Spinal Twist (Ardha Matsyendrasana). Look at the position of the hip in all these postures. Notice that the deep flexion can cause the thigh bone to bump into the pelvis.
How can we avoid, prevent or heal this injury? As with most things, prevention is the most effective method, as it will keep the body healthier and pain-free. To prevent this injury, pay close attention in any of these postures where your hip is deeply flexed. If you feel a pinching or pressure in the top/front of your hip, back off a bit. It can be challenging to separate this sensation from a stretching or engaged muscle, but the differentiation is quite clear once you notice it.
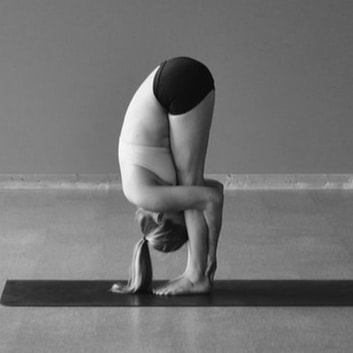
Anytime we use the arms to pull the leg deeper toward the pelvis, use great care! This is taking the hip joint past its normal range of motion, and is a common way to injure the hip. In most (perhaps all) situations, pulling will increase the risk of injury. Healing damaged hip cartilage is difficult. If you are only in Stage 1 or Stage 2, backing off of the postures will likely allow the body to heal. You will need to be conservative with the hip for awhile, at least six weeks. If you have a torn labrum, the conversation gets more complicated, as most will recommend surgical repair. The cartilage doesn't have a great blood supply, so it has trouble healing on its own. There are some stories of non-surgical success, but they are few and far-between. For us, the moral of the story is to be careful and gentle. Most people practice yoga to improve their health, and injury is the exact opposite of that.  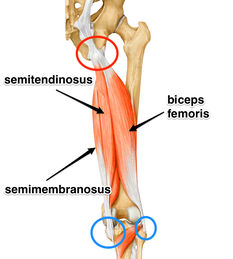 This is part of a series about Injuries In Yoga. The single most common injury that we see in the yoga world is a hamstring attachment injury. It happens due to over-stretching the hamstrings. Since so many postures and exercises target this muscle group on the back of the thighs, what often ends up happening is we over-stretch and the tendon that attaches the hamstrings to the sit bones gets damaged. Quite often, we mistake this new, intense sensation for a "deeper" hamstring stretch, so we continue to push (or more often pull). This makes it worse, and many of us don't realize there is an injury until serious damage has been done. Stretching the hamstrings has become central to many styles of yoga. Like many other physical elements of modern practice, this emphasis comes from gymnastics, contortion and dance. In any given class, we may stretch the hamstrings from numerous positions: standing, seated, legs together, legs split, one leg, both legs, etc. This injury creates pain at the point where the hamstrings attach to the sit bones (ischial tuberosities), at the base of the pelvis in the back, pictured to the right and circled in red. It can be painful in forward folding positions, and may be sore after class so that it hurts to sit down. It is sometimes called "yoga butt". This injury is so common that almost half of yoga practitioners---men and women---have it currently or have had it in the past. Common postures that could strain the hamstrings are: Hands to Feet, Standing Separate Legs Stretching (pictured above), Standing Bow, Standing Splits, Stretching, Separate Legs Stretching and Tortoise, etc. Take a moment to notice the similarities in these positions, pictured below. They all tilt the pelvis forward with relationship to the femur (thigh bone). This makes the hamstrings long, which is why we feel the "stretching" in the back of the leg. The deeper these postures are, and the harder we push them, the more likely it will be to damage the attachment of the hamstrings.
HOW TO HELP
First and foremost: rest. I know you don't want to hear this, and resting can be a real challenge for the mind and ego. This injury can take months or years to heal, and the more we aggravate it the longer it will take. Avoid forward folds for several months. Seriously! You can still do lots of other exercises and postures, but avoid forward bending of the hip for awhile. DO NOT STRETCH YOUR HAMSTRINGS! Second, don't overstretch the hamstrings, even after you're healed. The natural range of motion of the hamstrings only gets the femurs (thigh bones) to about 90 degrees with the pelvis when the knees are straight. This means that the vast majority of contortion-influenced yoga postures that "stretch" the hamstrings take it too far, which is why injury is so common. You might not be able to do Standing Splits with the same picturesque beauty, but you will be able to walk and sit without pain. Third, strengthen and shorten the hamstrings. We did a whole blog on this, where we explain a handful of postures and exercises that will make the legs strong and help prevent injury. These include Balancing Stick, Squatting, Bridge and Jastiasana. IN CONCLUSION The most important thing to take away from this is that you can get hurt from yoga practice. If you have pain at the back of your hip, the top of your hamstrings, at or near your sit bones, and this is exacerbated when you do forward folding postures, STOP IMMEDIATELY! It is very likely that you are damaging the upper attachment of the hamstrings. Take the time to let it heal, and then perhaps adjust your approach to the physical postures so that they have less likelihood of injury.  Over the past few months, we have heard increasingly loud calls for talk about injury in yoga. So many students are hurt or have pain, and they don’t know what it is, how it happened or how to fix it. Some are even told by their teachers to push through the sensation to continue deepening the physical postures. After all, these exercises and postures are supposed to be healing, right? When we describe the common yoga injuries, students are both 1) shocked that you can get hurt doing yoga, and 2) surprised to hear us describing the pain and difficulty that they experience.
Yes, yoga can hurt you. It’s true. If you’ve practiced the physical forms of yoga that are popular in the West for more than a few months, chances are you’ve been injured or know someone who has. This is not to say that physical yoga practices are inherently dangerous or should be avoided. The same risk is present in virtually any physical activity: basketball, running, bowling. Anytime we use the body in a repetitive way and push it to go farther and farther, the risk of injury is quite high. We generally don’t know the limits of our capabilities until we go too far! Yoga is mostly thought of as a healing, healthy and therapeutic form of exercise, not to mention safe. Since most of us approach the practices thinking they will help us, we overlook the possibility for injury until it’s too late. It is especially true in the yoga world, where we want to believe that it only has the ability to make us better, more open, happier, peaceful versions of ourselves. The idea that any of these practices could injure our bodies, nervous systems or minds feels foreign and even contradictory. So all too often we disregard it. Until we get injured. Even then, we may think it was our fault, that we weren’t doing the practice right, because a “healing” practice couldn’t possibly be dangerous. But injuries are quite common in yoga. And each style has its own tendency toward certain imbalances, as the stress and repetition in each practice are a little different. We are going to do a whole series of posts about Injuries In Yoga. We will go into some depth about the most common injuries we see, which include hamstring attachment strain, hip impingement and labral tear, meniscus tear in the knee, supraspinatus damage in the shoulder, bicep tendon strain in the shoulder, sacroiliac instability in the low spine, and neck pain in the base of the neck. All of these can be created or exacerbated by physical yoga practices. For now, we want you to know that yoga can injure you, especially if you think it never will. Always take care and try to understand what you’re doing and why. Some intense sensations are safe and even beneficial, while others are not. Use caution and ask your teacher if you’re not sure. If they tell you that you won’t hurt yourself in yoga, get a new teacher. If you have an injury or had one in the past that you’d like to tell us about, please comment or message. Let us know your experience! 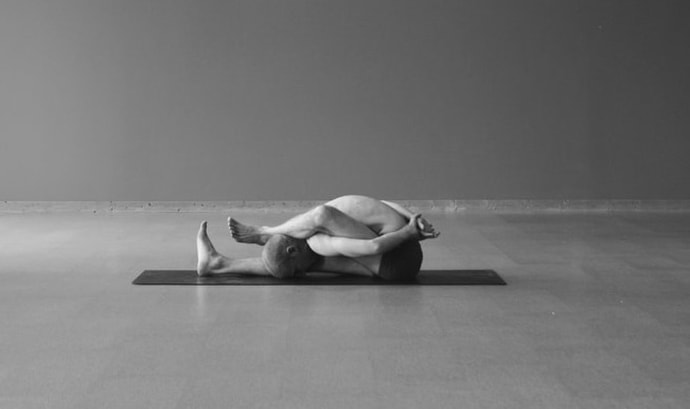 When we practice yoga postures, we might be doing them for different reasons. We may be trying to reduce the pain in our backs, improve our balance, burn a few calories or experience a deeper spirit within. These are drastically different goals, and we can't use the same techniques to achieve them all. Hundreds of "yoga" postures and practices exist these days, and they don't all attain the same things. As you practice, think carefully about what you are trying to accomplish, and use those postures that will help. Here are the 5 different types of yoga postures:
1. Seated, meditation postures. These are the oldest, most traditional yoga postures. When the Yoga Sutras (or any text that is more than 1,000 years old) refer to asanas, this is what they mean: a seated, upright, stable and relaxed position. These positions are not used for their own benefit or to create health, but to facilitate the more internal practices of breath control and meditation. These are the quintessential "yoga postures," Lotus and Siddhasana. 2. Positions to prepare the body for seated meditation or help the body recover from it. As anyone who has tried to sit still for a long period of time knows, it is difficult for the body. A certain amount of flexibility is required in the hips and knees, and some strength and control is required in the spine. How does one build these? Several positions, usually seated, were propagated in early hathayoga to help the body prepare for sitting or recover from the imbalances that arise during sitting. These postures include Cowface, Butterfly, Cobra, Bow and Locust. These are some of the first non-Lotus postures. 3. Anti-gravity postures. Influenced by tantra, hathayoga had many practices that were designed to prevent the precious bindu from dripping out of the head and into the abdominal fire. This was thought to improve vitality, spiritual potency and life. This is where we get the practices that turn the body upside down or "draw upward" the energy, winds or fluids of the body. Headstand, Shoulderstand, Mula Bandha, Uddiyana Bandha, and the upward-focused intention of many postures are intended for this purpose. 4. For physical health. These postures and exercises are much more recent, often coming from calisthenics, gymnastics and wrestling. They build strength, flexibility and health in the body. There are lots of different positions that affect varied parts of the body, so they are vast and diverse. Kuvalayananda called these "cultural" postures. These have become central to the practice of modern yoga. 5. For demonstration and impressive accomplishment. From ancient times, yogis have been associated with the ability to do remarkable feats. In the last couple hundred years, that has increasingly meant physical demonstrations of balance, endurance, strength and flexibility. Influenced by the developments of gymnastics, acrobatics and contortion, these practices include Splits, Handstand and most arm balances. This tendency toward outwardly impressive beauty has been compounded with the rise of photography, the internet and visual communication media like Instagram. Who doesn't love to see a beautiful, impressive picture of a body? One type of posture is not better than the others. There is no hierarchy here, though as yogis some danger lies in focusing on the body and in cultivating techniques for display. Worth noting is that postures can have drastically different purposes, goals and intentions. When we practice them, we should know what we are practicing so we can move in the right direction. 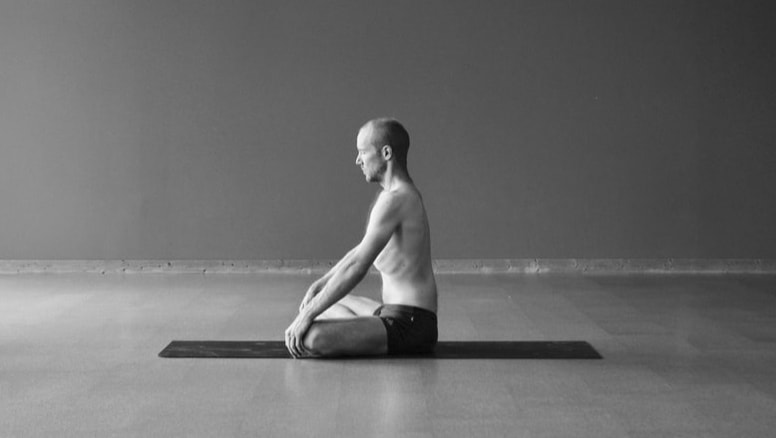 Western medicine has known for decades (and yogis have known for thousands of years) that controlling the breath is a powerful tool to access the mind.
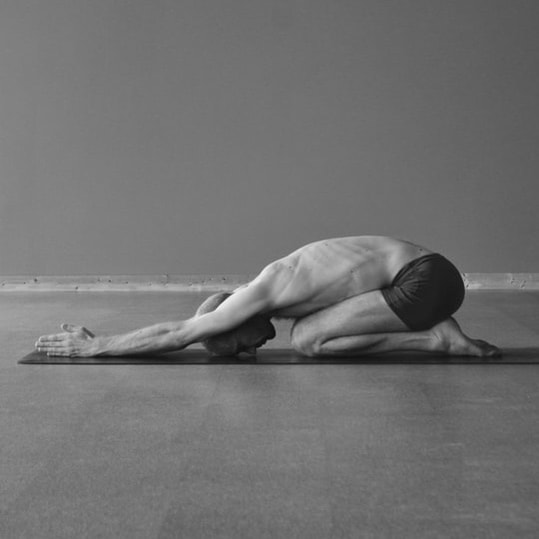
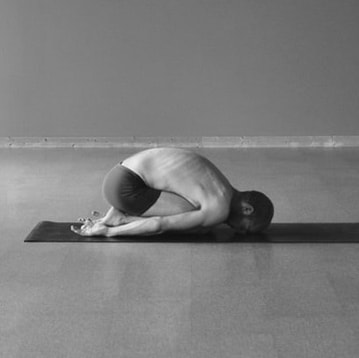
Now we know that this connection is largely via the autonomic nervous system. Every time we inhale, the heart rate goes up a little. And every time we exhale, the heart rate goes down a little. This is controlled by the two parts of the autonomic nervous system (sympathetic and parasympathetic, respectively). In everyday life we tend to get overwhelmed with tasks and stress, which causes an overstimulation of our "active" nervous system. Our heart rate stays a little higher, we have trouble relaxing and we feel this as stress. In recent years breathing techniques have been making their way into the popular culture, with everything from heart rate variability monitoring devices to smartphone apps that help you control the breath. This includes a great new app called the "Breathing App" developed by yogi Eddie Stern and Deepak Chopra. The basis of their app is so-called "resonance" breathing, a specific, regular tempo that has benefits like lowering the blood pressure, improving heart rate variability and positive applications for anxiety and depression. The tempo is not difficult to achieve and is accessible for nearly every person. It ranges from breathing 5-7 times per minute as opposed to our normal rate that is closer to 15 times per minute. (5 times per minute is 12 seconds for a complete inhale & exhale. 7 times per minute is about 9 seconds for a complete inhale & exhale.) We recommend the "Breathing App." It is free and quite simple to use. It requires nothing more than a couple minutes of your time to breathe, regulating your inhale and exhale to achieve the coherence and resonance between the breath, heart and nervous system. Hopefully it will bring a little bit of peace, relaxation and well-being. 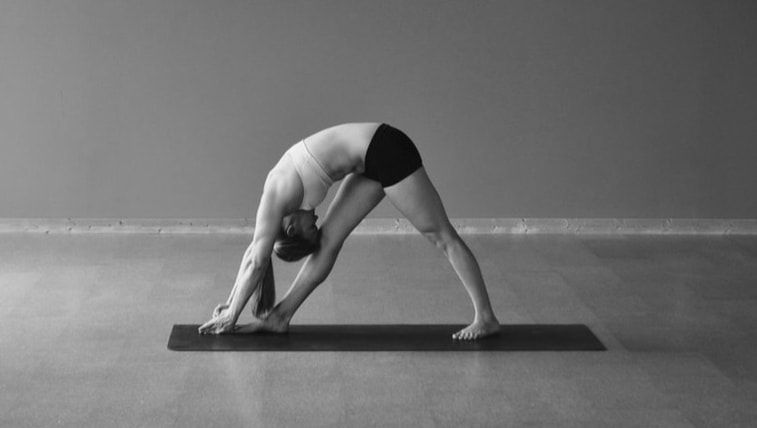 Put your forehead on your knee!
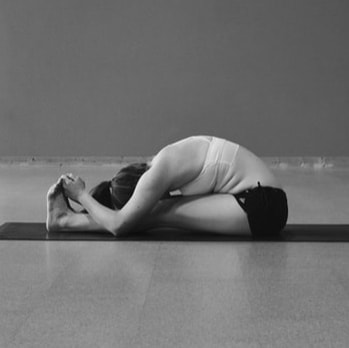
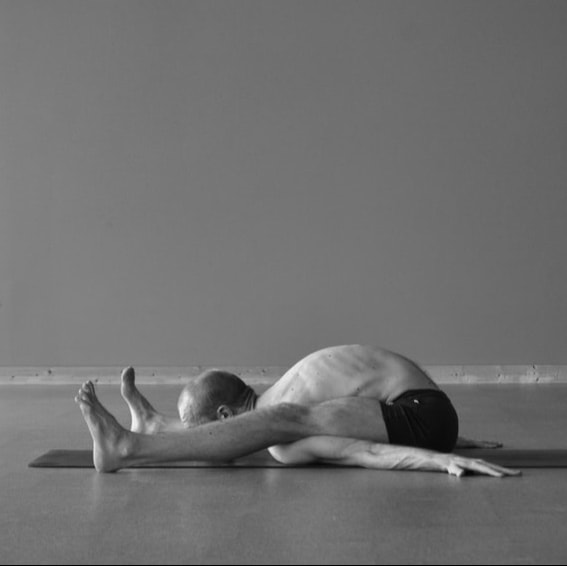
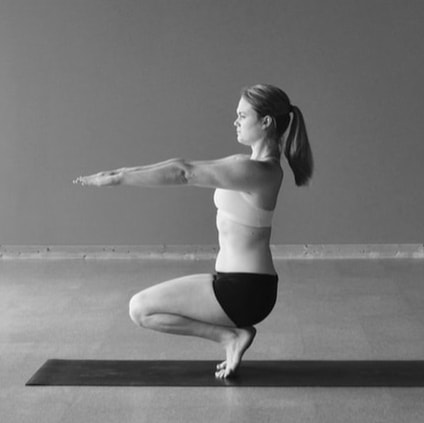
We've all heard this instruction thousands of times. The phrase and its variations have become synonymous with correct practice of "head to knee" postures. The problem is this: the forehead touching the knee should be a result of the correct muscular usage, not the end goal. This may be a surprise, but there is little to no benefit in touching your head to your knee. Unless you are making the argument that the head benefits from its contact with the knee (which it might, due to a nerve plexus or gland), or the knee benefits from its contact with the head, it becomes obvious that the value of the position lies somewhere else, even if the well-known signifier of the posture is the famous "head on the knee." The distinct benefit comes from using the abdominal muscles (rectus abdominis) to bend the spine forward, compressing the organs, glands and intestines; and from forward- bending the neck, compressing the throat. These two foundational elements are then accentuated by what the rest of the body is doing, whether balancing on one leg as in Standing Head to Knee, maintaining external rotation of the opposite hip as in Seated Forehead to Knee, or kneeling as in Rabbit. Sometimes the cue---to put the head on the knee---and the posture work together. Great! The muscles in the neck and abdomen engage, the spine bends forward, the throat and abdominal contents get compressed, and the head touches the knee. But often the instruction and the posture don't work together. Our head may be able to touch the knee without the valuable engagement, bending and compression. We get the end result of the cue, so we think we are benefitting from the posture. But the important parts of the posture are left undone. Those that struggle with "head to knee" poses will get great benefit in finding their abs and contracting them as best they can. Will their head get close enough to touch their knee? Maybe, but maybe not. Those that are stronger should try to get their head closer to their hip than their knee. This will continue to develop their abdominal strength and compression past the point of their head on their knee. "Touch your forehead on your knee" can be a great visual cue. However, as practitioners and teachers, we need to remember cues are attempting to make an action happen in the body. They are not the goal in and of themselves. 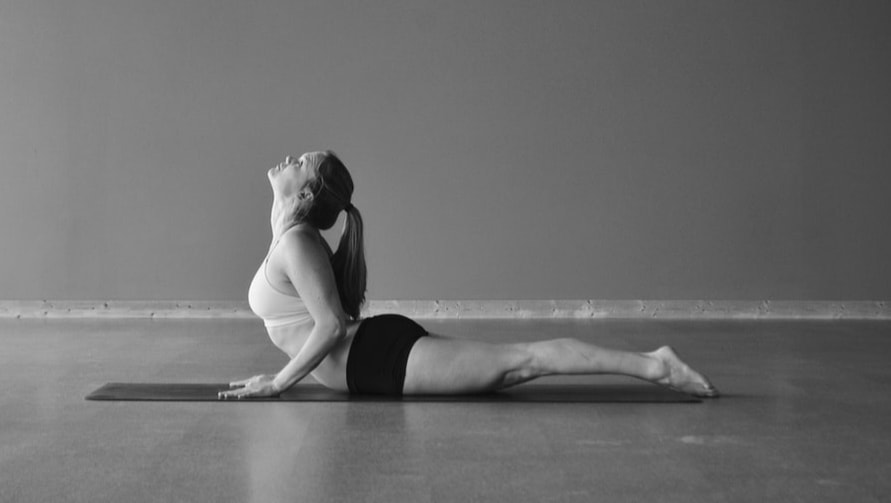 In a yoga class there are many complex and interesting postures to put the body in. They challenge our strength, flexibility, balance, concentration and coordination. It is easy to get lost in fascination with this complexity and lose track of the simplest, most fundamental things our body should be able to do: squatting; sitting up and its opposite; pushing up with the arms; and pulling up.
The opposite of a sit-up is also important. You may call it a back sit-up, back extension or Cobra Posture as it is often named in yoga (pictured at the top of this article). Either way, it involves lying on your abdomen and using your back muscles to bend your spine backward. The combination of these two motions---sit-up and back sit-up (cobra)---will strengthen and stabilize the spine.
These are 5 simple and important movements that every healthy body should be able to do to some degree. If we lose our ability to do these basic movements but still cultivate more complex ones, we are increasingly likely to develop imbalance and injury. Since the physical practices of yoga are about balancing the body more than anything else, it is always worth visiting and revisiting these movements. Without a balanced body, a balanced mind is almost impossible.
|
AUTHORS

Scott & Ida are Yoga Acharyas (Masters of Yoga). They are scholars as well as practitioners of yogic postures, breath control and meditation. They are the head teachers of Ghosh Yoga.
POPULAR- The 113 Postures of Ghosh Yoga
- Make the Hamstrings Strong, Not Long - Understanding Chair Posture - Lock the Knee History - It Doesn't Matter If Your Head Is On Your Knee - Bow Pose (Dhanurasana) - 5 Reasons To Backbend - Origins of Standing Bow - The Traditional Yoga In Bikram's Class - What About the Women?! - Through Bishnu's Eyes - Why Teaching Is Not a Personal Practice Categories
All
Archives
May 2024
|


 RSS Feed